ESL Lesson Plan on Jobs and Occupations
Learning vocabulary and expressions about jobs and occupations is essential for ESL students, both young and old. Learning this topic will enable children to talk about what jobs their family members do. They can also talk about their interests and what they want to be when they grow up. Older learners also need to learn this topic to talk about their place of work, or to prepare for job interviews.
Whichever kind of students you are teaching, Jobs and Occupations is an essential topic for ESL learners. The following ESL lesson plan on jobs and occupations includes games and activities to help you teach this topic in a fun and interesting way. The games and activities in this lesson plan are mainly aimed at kids/beginner learners of English. All the PDF materials for this lesson can be downloaded below. In addition, at the bottom of this page you can find activity videos, PowerPoint Games, and other printable lesson materials to teach jobs and occupations to ESL learners.
Materials for this lesson:
Beginner ESL Lesson Plan on Jobs and Occupations
Step 1: Introduce the Topic and Keywords

Most ESL students, even young kids, have some concept of jobs because their parents, teachers, and other family members around them have occupations. Even so, it is important to put the lesson in context and introduce the concept of jobs to your students. One easy and effective way to do this is by listening to a jobs song and asking students to guess what they are going to study. The People Song on YouTube is great for this as it features many different occupations. But, you can use any job song you like.
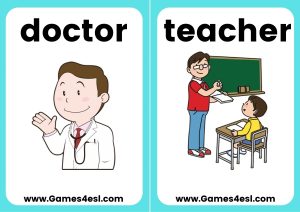
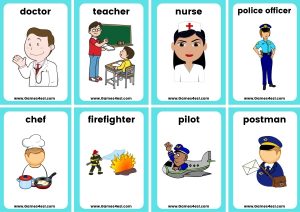
Ask students to listen to the song and guess what topic they are going to study. Then ask students what jobs they already know. This will activate their existing knowledge and will help them to understand what the lesson will be about. Next, practice the names of occupations using these 8 jobs flashcards (or prepare your own). Show students the flashcards one by one and ask them to repeat after you. Then, show them the flashcards again and ask students to say the words on their own.
After practicing a few times, practice more with a fun flashcard game. Mix up the flashcards and choose one but don’t show the students. Ask the students to raise their hands and guess what job flashcard you are holding. This activity forces students to recall the keywords they just practiced. Next, allow the student who guessed correctly to come to the front and choose another flashcard. That student then holds the card without showing the other students and asks them to guess what it is.
Elementary aged ESL students love this flashcard game as they get to come to the front and act like the teacher when they guess correctly.
Step 2: Teach The Key Expressions
Once students have practiced the keywords, it’s time to practice some key sentences. Before drilling the key expressions, it is important to put the sentences in context so students can more easily understand the meaning of the sentences. For example, when teaching ‘What do you do? – I am a (doctor).’, you can begin by asking students ‘What is my job?’. Surely, they will know that you are a teacher.
Then you can ask students, ‘Are YOU a teacher?’ to which they will reply ‘No’. Then you can ask them ‘What do you do?’ and try to elicit from them ‘I am a student’. Next, ask students to ask you ‘What do you do?’ to which you can answer ‘ I am a teacher.’ Once you have put the key expressions in context and learners have grasped the basic meaning of the sentences, you can drill the target language using the flashcards.
The exact key expressions you teach will depend on the age and level of your students, and on your own curriculum goals. Here are some example sentences you can teach while teaching the topic of jobs and occupations:
- What do you do? – I am a (teacher).
- What does he/she do? – He/She is a (doctor).
- What does your father/mother do? – He/She is a (pilot).
- What do you want to be? – I want to be a (police officer).
- What is your dream job? – I’ve always wanted to be a firefighter.
Step 3: Listening Activity – Line Bingo

This fun classroom game requires students to have their own set of mini flashcards. Print and cut these jobs student cards and give one set to each student or pair of students. Next, ask them to put their cards in a horizontal line in any order they want. Once students have placed their cards in a line, the line bingo game can begin.
The aim of the game is for students to turn over all their cards. Using the key expressions, the teacher should say the job names one by one. For example, all the students would shout out, ‘What do you do?’ and the teacher would answer, ‘I am a (doctor). The students then look at their line of cards, and if that job card is on the left or right end of the line, then they can turn that card over.
If the job that the teacher called out is in the middle of the line of cards, then students can not turn their card over. Next, the students would ask again, ‘What do you do?’ and the teacher would answer. The first student to turn over all their cards has bingo, and they are the winner.
After playing one time, you can play again. To make it more fun, allow the students to take turns coming to the front to choose the next card. The other students would ask, ‘What do you do?’ and the student at the front would answer, ‘I am a (police officer).’
Step 4: Speaking Activity 1 – Board Game

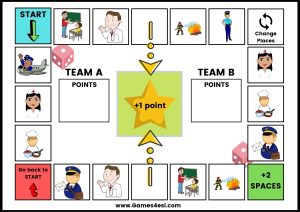
This board game is a great way to get students to speak using the target language that you taught in steps 1, 2, and 3. Print out this jobs board game for this activity and give one to each pair of students. Provide each pair with one dice, too. Students also need one eraser each (or anything small to act as their game piece).
Students will take turns rolling the dice and moving their game pieces. After moving their game piece, students should have a dialogue with their partner based on the occupation depicted in the square. For example, if a student lands on the square with the ‘pilot’, their partner should ask ‘What do you do?’, and the student should answer ‘I am a pilot.’ After making a dialogue, it’s the other student’s turn.
The aim of the game is to get to the ‘center star’ to get a point. The only way to get to the center star is to land on the middle squares where the arrows are. If a student makes it to the center star, then they get one point and then move back to the start. The teacher can decide how long to play the game. For example, for 5 minutes / first to 5 points, etc. As with any activity, make sure you explain and model how to play before beginning this game.
Step 5: Speaking Activity 2 – Find Your Partner
This ESL speaking activity get’s students up out of their seats and interacting with their classmates. For this game, you can re-use the student cards that were used in the line bingo game above. In this game, students must walk around and talk with their friends to find someone with the same card as them.
To play this game, give each student a job card. Instruct students that they are not allowed to show the card to anybody. To find their partner, students must walk around and speak with their classmates using the target language. For example, if you are teaching the question ‘What do you do?’ to talk about jobs, your students would walk around and ask each other ‘What do you do?’. Then, they would answer using the job on the card (e.g., I am a doctor.). Once students find their partner, they take the card to the teacher and then sit down.
Step 6: Review
At the end of the lesson, review the keywords and expressions from the lesson. A great way to do this is to have students line up at the door, and ask them a question one by one before they leave. For example, you can show them one of the flashcards and ask students, ‘What do you do?’ / ‘What does he do?’, etc. This is a useful way to review with each student and check how much they learned from the lesson.


